- Contact Us
- Home
- Tutorial
- Download
LiteMesh is a versatile and lightweight API gateway designed to simplify the challenges of dynamic routing, security, and resilience, prioritizing ease of use and performance. Tailored for developers and Site Reliability Engineers (SREs), LiteMesh enables teams to swiftly download, configure, and deploy it, making it an ideal solution for microservices and serverless architectures.
Unlike many bulky and complex alternatives, LiteMesh emphasizes a developer-centric approach, delivering a streamlined framework that fits effortlessly into existing workflows. With its focus on essential features and minimal overhead, LiteMesh empowers teams to effectively handle traffic, implement security measures, and ensure strong service resilience.
LiteMesh is designed to function effectively as either a standalone gateway or a cloud-native component within a broader infrastructure, offering unmatched versatility to adapt to evolving API ecosystems.
As a standalone gateway, LiteMesh can operate independently, making it ideal for on-premises setups or scenarios where isolated, secure control over API traffic is crucial. This is particularly beneficial for businesses with strict compliance requirements or limited access to cloud services.
On the other hand, when integrated as a component of a cloud-based infrastructure, LiteMesh seamlessly supports modern, distributed environments. Its compatibility with container orchestration platforms like Kubernetes and serverless architectures ensures it fits naturally into highly scalable and dynamic systems. This dual-mode functionality allows organizations to tailor LiteMesh to their specific operational needs, making it a practical solution for addressing immediate challenges while positioning for future growth in microservice and API-driven ecosystems.
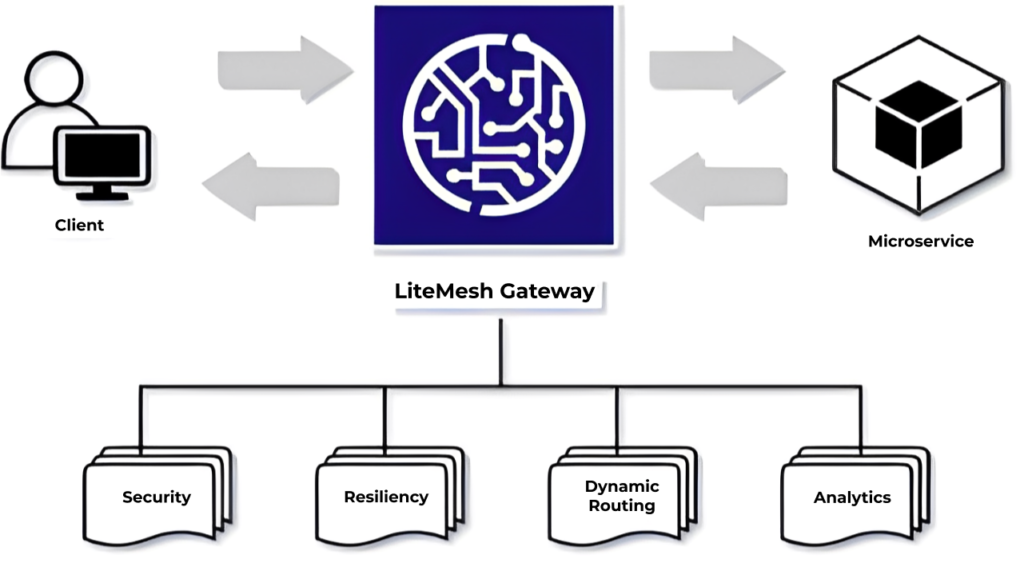
LiteMesh delivers a comprehensive suite of features tailored to meet the demands of modern API management, with security, resiliency, dynamic routing, and analytics at its core.
Security is a top priority, with LiteMesh offering advanced measures to safeguard data and prevent unauthorized access. It includes built-in support for encryption, authentication, and authorization protocols, ensuring that sensitive information remains protected across all communication channels. This makes it a reliable solution for industries that require strict compliance, such as finance, healthcare, and e-commerce.
Resiliency is another cornerstone of LiteMesh, enabling seamless handling of failures and ensuring consistent service availability. It employs intelligent load balancing and automatic failover mechanisms to maintain uptime, even in the face of unexpected disruptions.
Dynamic Routing capabilities further enhance its adaptability, allowing real-time traffic management and routing adjustments to meet shifting demands.
Additionally, LiteMesh’s integrated Analytics provide teams with actionable insights, offering visibility into API performance, traffic patterns, and potential bottlenecks. These features collectively empower organizations to build secure, robust, and highly efficient API ecosystems that evolve with their needs.

This adaptability is crucial across various industries and business scales. Startups, for example, can use LiteMesh to quickly deploy lightweight and cost-effective solutions that support their fast-paced development cycles, while enterprise-level businesses benefit from its robust features to manage complex, large-scale operations seamlessly.
E-commerce platforms can rely on LiteMesh for dynamic routing and managing traffic during peak shopping seasons, financial services can utilize its strong security features to protect sensitive transactions, and healthcare organizations can integrate diverse systems like patient records and telemedicine services securely. LiteMesh’s ability to cater to both startups and established enterprises underscores its value in supporting diverse operational needs and long-term growth.

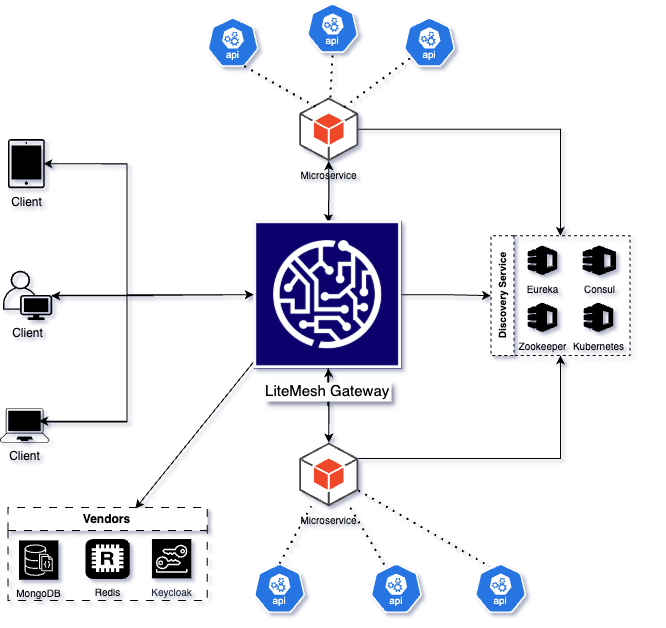
LiteMesh acts as the cornerstone of the API ecosystem, serving as a centralized gateway for all microservices communication. By routing all requests through the gateway instead of permitting direct service-to-service interactions, LiteMesh streamlines workflows, minimizes conflicts, and significantly enhances security. This centralized approach ensures better control and monitoring of all API traffic while maintaining a simplified and secure architecture.
Dynamic routing is a key feature of LiteMesh, enabling efficient request handling based on service discovery, load balancing, and custom application rules. The gateway and microservices register with a Service Discovery component, facilitating seamless routing by service names and balancing loads across multiple instances. This ensures optimal performance and adaptability in complex systems.
Security is robustly enforced on two levels: from clients to the gateway, using JWT validation integrated with OAuth2 identity providers like Keycloak, and between the gateway and services via Mutual TLS (mTLS), ensuring end-to-end encrypted communication and strong authentication.
To ensure resilience, LiteMesh incorporates advanced mechanisms such as:
All configurations for routing, security, resilience and analytics are dynamically managed and stored in MongoDB, enabling real-time updates and adaptations. This ensures LiteMesh effectively safeguards APIs from threats, overloads, and vulnerabilities while maintaining a high-performing and flexible API management system.
DOCKER-COMPOSE
First of all, you need a docker setup. For Mac, Docker Desktop is enough. In your docker setup, make sure to point the docker-compose.yml.
The docker-compose service is the first service that you need to run:
- docker-compose
- discovery-server
- api-gateway
- inventory-service
- product-service
Once you run it, the following services will be running;
| SERVICE | URL | ACCESS |
|---|---|---|
| keycloak-service | localhost:8281 | admin, admin |
| mongodb-service | 127.0.0.1:6379 | - |
| mongodb-service | localhost:27017 | root, mongopw |
| pgadmin-service | localhost | - |
| postgress-service | localhost:5432 | - |
| redis-service | 127.0.0.1:6379 | - |
That's how your Mac Docker Desktop looks like:
Now it's time to configure the Keycloak. All you have to do is to import the lite-mesh-gateway-client.json
Copy paste the below into your json file and import it in the Keycloak.
					{
  "clientId": "lite-mesh-gateway-client",
  "name": "Lite Mesh Gateway Client",
  "description": "Lite Mesh Gateway Client",
  "rootUrl": "http://localhost:7777",
  "adminUrl": "http://localhost:7777",
  "baseUrl": "http://localhost:7777",
  "surrogateAuthRequired": false,
  "enabled": true,
  "alwaysDisplayInConsole": true,
  "clientAuthenticatorType": "client-secret",
  "secret": "SVwQlpupiIKUctK1Vh0yYwLxgkMZjjqY",
  "redirectUris": [
    "/*"
  ],
  "webOrigins": [
    "/*"
  ],
  "notBefore": 0,
  "bearerOnly": false,
  "consentRequired": false,
  "standardFlowEnabled": false,
  "implicitFlowEnabled": false,
  "directAccessGrantsEnabled": false,
  "serviceAccountsEnabled": true,
  "publicClient": false,
  "frontchannelLogout": true,
  "protocol": "openid-connect",
  "attributes": {
    "realm_client": "false",
    "oidc.ciba.grant.enabled": "false",
    "client.secret.creation.time": "1731616251",
    "backchannel.logout.session.required": "true",
    "display.on.consent.screen": "false",
    "oauth2.device.authorization.grant.enabled": "false",
    "backchannel.logout.revoke.offline.tokens": "false"
  },
  "authenticationFlowBindingOverrides": {},
  "fullScopeAllowed": true,
  "nodeReRegistrationTimeout": -1,
  "protocolMappers": [
    {
      "name": "Client IP Address",
      "protocol": "openid-connect",
      "protocolMapper": "oidc-usersessionmodel-note-mapper",
      "consentRequired": false,
      "config": {
        "user.session.note": "clientAddress",
        "id.token.claim": "true",
        "introspection.token.claim": "true",
        "access.token.claim": "true",
        "claim.name": "clientAddress",
        "jsonType.label": "String"
      }
    },
    {
      "name": "Client ID",
      "protocol": "openid-connect",
      "protocolMapper": "oidc-usersessionmodel-note-mapper",
      "consentRequired": false,
      "config": {
        "user.session.note": "client_id",
        "id.token.claim": "true",
        "introspection.token.claim": "true",
        "access.token.claim": "true",
        "claim.name": "client_id",
        "jsonType.label": "String"
      }
    },
    {
      "name": "Client Host",
      "protocol": "openid-connect",
      "protocolMapper": "oidc-usersessionmodel-note-mapper",
      "consentRequired": false,
      "config": {
        "user.session.note": "clientHost",
        "id.token.claim": "true",
        "introspection.token.claim": "true",
        "access.token.claim": "true",
        "claim.name": "clientHost",
        "jsonType.label": "String"
      }
    }
  ],
  "defaultClientScopes": [
    "web-origins",
    "acr",
    "roles",
    "profile",
    "gateway.read",
    "product-service.read",
    "basic",
    "email",
    "inventory-service.read"
  ],
  "optionalClientScopes": [
    "address",
    "phone",
    "organization",
    "offline_access",
    "microprofile-jwt"
  ],
  "access": {
    "view": true,
    "configure": true,
    "manage": true
  }
}
To upload the Keycloak client manually, please follow this link: https://github.com/mehmetsen80/LiteMeshApp/blob/master/KEYCLOAK.md
To configure the IntelliJ Settings for discovery-server:
Virtual Machine (VM):
-Djavax.net.debug=ssl:handshake
The -Djava.net.debug=ssl:handshake is actually not mandatory. It's for the use of having ssl debug logs.
Environmental Variables (EV):
EUREKA_KEY_STORE=/Users/mehmetsen/IdeaProjects/LiteMeshApp/keys/eureka-keystore.jks;EUREKA_KEY_STORE_PASSWORD=123456
You can validate discovery-server from https://localhost:8761/
Right now there is no application that's registered by discovery-server.
To configure the IntelliJ Settings for api-gateway:
Virtual Machine (VM):
-Djavax.net.ssl.trustStore=/Users/mehmetsen/IdeaProjects/LiteMeshApp/keys/gateway-truststore.jks -Djavax.net.ssl.trustStorePassword=123456 -Djavax.net.debug=ssl:handshake
Environmental Variables (EV):
GATEWAY_KEY_STORE=/Users/mehmetsen/IdeaProjects/LiteMeshApp/keys/gateway-keystore.jks;GATEWAY_KEY_STORE_PASSWORD=123456;GATEWAY_TRUST_STORE=/Users/mehmetsen/IdeaProjects/LiteMeshApp/keys/gateway-truststore.jks;GATEWAY_TRUST_STORE_PASSWORD=123456;KEYCLOAK_GATEWAY_URL=localhost;KEYCLOAK_GATEWAY_PORT=8281
Let's run the api-gateway service:
- docker-compose
- discovery-server
- api-gateway
- inventory-service
- product-service
Let's validate api-gateway from discovery-service https://localhost:8761/
Yes it's there:
Virtual Machine (VM):
-Djavax.net.ssl.trustStore=/Users/mehmetsen/IdeaProjects/LiteMeshApp/keys/client-truststore.jks -Djavax.net.ssl.trustStorePassword=123456
Environmental Variables (EV):
CLIENT_KEY_STORE=/Users/mehmetsen/IdeaProjects/LiteMeshApp/keys/client-keystore.jks;CLIENT_KEY_STORE_PASSWORD=123456;CLIENT_TRUST_STORE=/Users/mehmetsen/IdeaProjects/LiteMeshApp/keys/client-truststore.jks;CLIENT_TRUST_STORE_PASSWORD=123456
Let's run the inventory-service:
- docker-compose
- discovery-server
- api-gateway
- inventory-service
- product-service
Virtual Machine (VM):
-Djavax.net.ssl.trustStore=/Users/mehmetsen/IdeaProjects/LiteMeshApp/keys/client-truststore.jks -Djavax.net.ssl.trustStorePassword=123456
Environmental Variables (EV):
CLIENT_KEY_STORE=/Users/mehmetsen/IdeaProjects/LiteMeshApp/keys/client-keystore.jks;CLIENT_KEY_STORE_PASSWORD=123456;CLIENT_TRUST_STORE=/Users/mehmetsen/IdeaProjects/LiteMeshApp/keys/client-truststore.jks;CLIENT_TRUST_STORE_PASSWORD=123456
Let's run the product-service:
- docker-compose
- discovery-server
- api-gateway
- inventory-service
- product-service
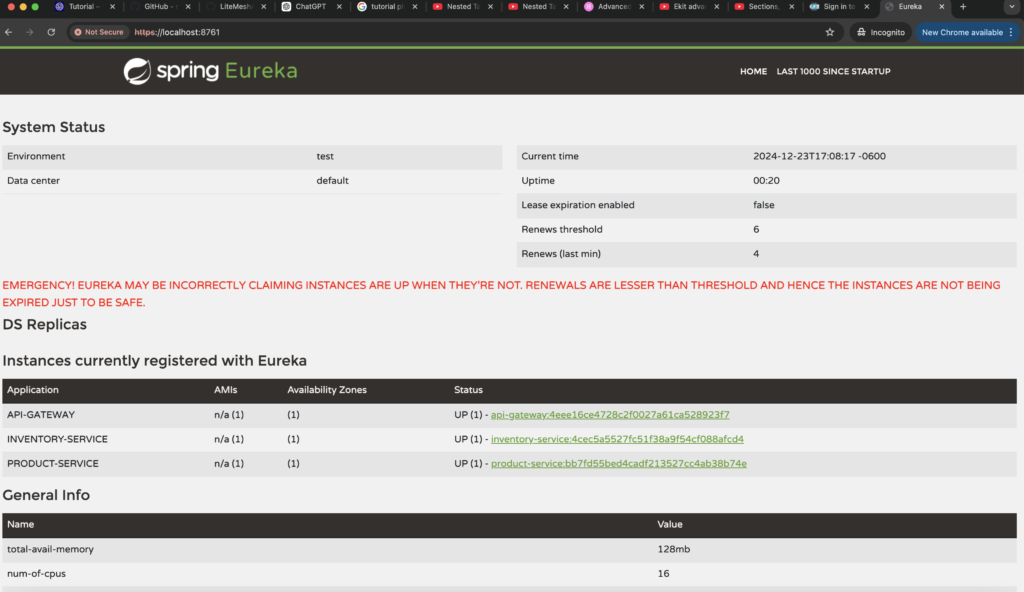
Let's validate all services from discovery-service https://localhost:8761/:

TODO:
TODO: